Adding Checkmarks In Microsoft Word: An Easy Guide

When you're working through a to-do list, you need a way to quickly and concisely mark your tasks as accomplished. You need a simple symbol that immediately conveys to any onlookers "This task is done." The classic checkmark is one of the best symbols for this purpose, but while it's easy to quickly scratch one down on a physical notepad, it's a little bit more complicated if you're making lists in Microsoft Word.
While you can technically draw symbols in Microsoft Word, drawing symbols by hand can result in something that isn't properly sized and formatted like the rest of the document. Therefore, if you want a clean checkmark, you need to utilize the program's built-in font and symbol management system. Once you understand how this system works, you can quickly add not only checkmarks, but all kinds of nontraditional symbols to your writings, whether for organizational purposes or just to give them a little razzle-dazzle.
Quickly adding checkmarks

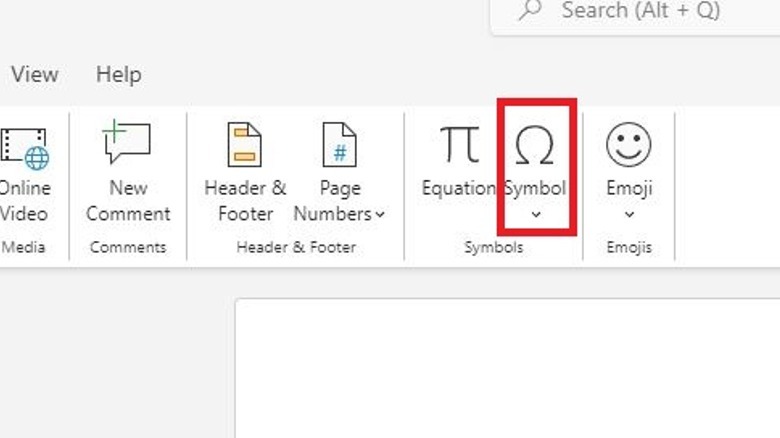
If you want to add checkmarks to your writings in Microsoft Word, you can do so through the Symbols menu. The Symbols menu holds a complete repository of every font Microsoft Word has loaded, as well as all of their associated symbols.
 Daniel Trock/SlashGear
-
In Microsoft Word, place your cursor on the spot in the document you want to add a symbol.
-
Switch to the Insert tab in the top bar.
-
Click on the Symbol button in the bar to bring up a grid of available symbols.
-
Click on the checkmark symbol to add it to your document.
Bear in mind that the checkmark symbol may not automatically show up in the Symbol box if you haven't used it before. If it's not there, you'll need to manually retrieve it from the detailed Symbols menu at least once, after which it'll show up in the box as a shortcut.
 Daniel Trock/SlashGear
-
Click the Symbol button in the bar to open the box.
-
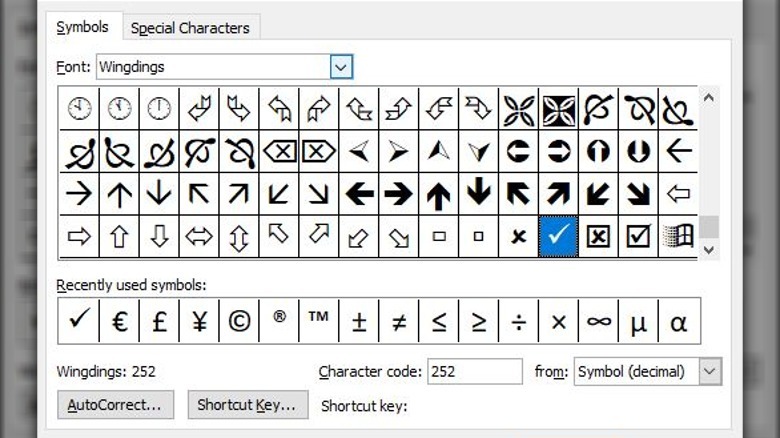
Click the More Symbols button.
-
In the new window, scroll through the grid of symbols until you find the checkmark.
-
Double-click on the checkmark to add it to the document.
Advertisement
If you don't see the checkmark in the grid, try using the font selector to switch to a different font library. You should be able to find the checkmark in the Wingdings font.
Utilizing font codes

Every individual letter and symbol in a font library has its own character code, and if you know the code, you can quickly add a symbol to your document with a few keystrokes.
Here's how to do this with a checkmark.
-
Use the More Symbols grid to find the checkmark and click on it.
-
The checkmark's character code will be displayed at the bottom of the window.
-
In your document, place your cursor where you want to put a checkmark.
-
On your keyboard, hold the Alt key and use your numpad to enter the character code.
-
Release the Alt key, and the symbol will appear.
Since the checkmark is part of Wingdings, you won't get one if you enter its code, 0252. If you're using a standard font like Arial or Calibri, you should get a "ü" symbol. If you highlight that symbol, and then use your font selector to switch to Wingdings, it should become a checkmark.
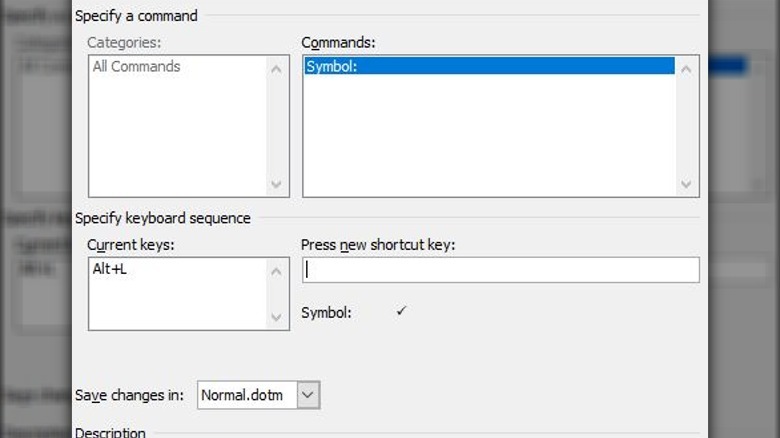
You can also use the Symbol grid to set up a dedicated shortcut for a symbol.
 Daniel Trock/SlashGear
-
In the More Symbols grid, select a symbol.
-
Click the Shortcut Key button.
-
Enter a key or key combination.
-
Click the Assign button.
-
Input your shortcut in the document to immediately place the symbol.
With a shortcut, you don't need to change fonts to get the symbol you're looking for. Just remember to assign it to something you can remember!