How To Connect To A Hidden Wi-Fi Network
Those who prefer privacy or might be concerned with people trying to use their network might create a hidden Wi-Fi network. Hidden Wi-Fi networks are similar to the typical Wi-Fi setup, except that the name of the network is invisible to other devices. With a hidden network ID or SSID, it makes it so that your network doesn't show up on the list of available Wi-Fi networks when a phone or laptop is trying to connect to the internet.
While creating a hidden network might seem like a boost in security, it doesn't actually do much to improve the security of the network but does have other uses in specific scenarios. For instance, it could be useful if you're trying to keep someone off your internet or for businesses that have public free Wi-Fi.
However, if you are trying to connect to a hidden Wi-Fi network, it can make the connection process a bit more complex. Luckily, it's easy to connect; you'll just need the information you'd need to access the network regularly.
How to connect to a hidden Wi-Fi network on Windows 10 and Windows11
Connecting to your hidden Wi-Fi network using Windows 10 and Windows 11 is easy and only requires a few steps. Before you try to connect, make sure that you have the network's name and password. Once you have that information, follow these steps:
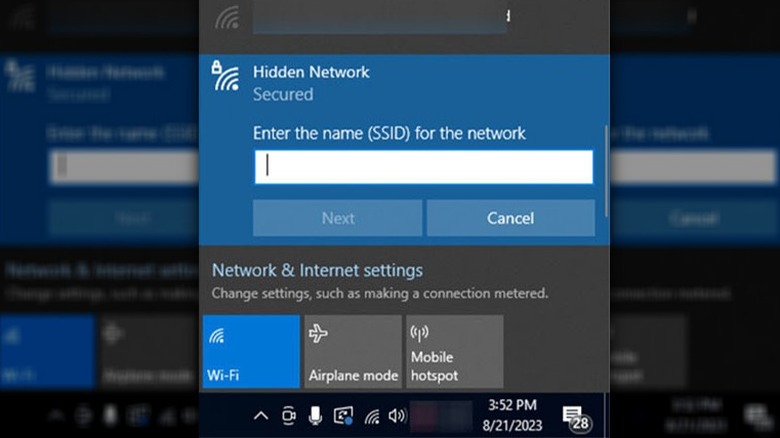
- Left-click the Wi-Fi icon in the bottom right of the taskbar. When you do so, you'll see the words "Hidden network" indicating that the SSID is hidden.
- Click the Hidden network that you want to connect to, then select the Connect button.
- Enter the SSID or network name and click Next.
- Enter the network security key, or password, then click Next again.
After entering the password for the network, it should automatically connect. Alternatively, if you can't find the hidden network on your device, you can manually enter the information to find the network. For this method, you'll need an additional piece of information called the Security type. To do this, right-click the Internet icon in the toolbar, then select Open Network & Internet Settings before hitting the Wi-Fi tab on the left of the Settings screen. There, select Manage known networks, then Add a new network. From here, enter the Network name and Security type then enter the network password and hit Save to connect to the hidden network.
How to connect to a hidden Wi-Fi network on Mac OS Ventura 13 and Mac OS Monterey 12
Connecting using Mac OS is easy, as long as you have the right information. You will need the network name, security type, as well as a username and password in most cases. In rare cases, you'll also need the mode and identity, depending on the security of the Wi-Fi network. To connect to a hidden Wi-Fi networking using Mac OS Ventura 13 and Mac OS Monterey 12:
- Click the Wi-Fi icon in the menu bar.
- Select Other Networks.
- Click Other at the bottom of the network list.
- Enter the Network Name and Security Type.
- Enter the mode, identity, user name, and password.
- Select Join.
Some of the fields may differ depending on the wireless security of the device. Not all fields may be necessary for your Mac device, but can be found within your network settings.
How to connect to a hidden Wi-Fi network on Android
Connecting to a hidden Wi-Fi network on an Android device is fairly straightforward. To connect to a hidden Wi-Fi network on Android, you'll need to have the network SSID, password, and security type. To connect to a hidden Wi-Fi network on Android:
- Swipe down on the home screen and select Internet.
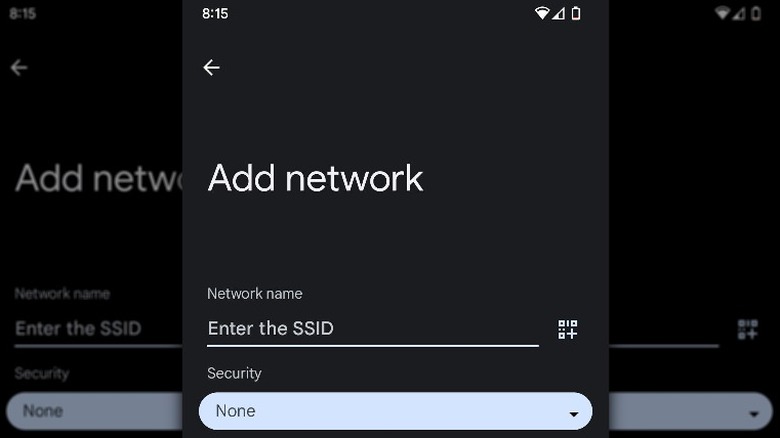
- Tap Add network.
- Enter the SSID and select the security type.
- Enter the password.
- Tap Connect.
If you need to find the SSID for the wireless network, it can usually be found within the network settings for your router or modem. Connecting via an Android device is typically pretty easy, though in rare cases, you may need to enter more information about the network if it has enhanced security. If so, these fields can be found in the Advanced Options portion of your Wi-Fi settings on the mobile device.
How to connect to a hidden Wi-Fi network on iOS
Connecting to a hidden Wi-Fi network using an iPhone is pretty simple, but you'll need the right information. To connect to a hidden Wi-Fi network using iPhone, you'll need the network name, security type, and password for the hidden network. To connect to a hidden Wi-Fi network on iOS:
- Open Settings.
- Tap Wi-Fi, then tap Other.
- Enter the hidden network name and security type.
- Enter the password.
- Tap Join.
It's fairly simple to join a Wi-Fi hidden network using an iPhone, as long as you have all the required information for the network. That information can usually be found within your router or modem settings if you don't have it. The hidden network name will be the name of the Wi-Fi network that you're trying to connect to. If you're looking for this information at work, you'll want to ask your IT administrator for the details.
Are hidden networks more safe than regular Wi-Fi networks?
The simple answer is no. There is no added security to a hidden Wi-Fi network over a traditional Wi-Fi network. Some argue that having a hidden network could, in some cases, be less secure than a regular Wi-Fi network due to hackers potentially picking up broadcast signals from your device when you are away from the hidden network.
Internet and network hackers often use highly sophisticated software, and since hiding your network simply hides the name of the network and doesn't provide any added layer of security, it's highly unlikely hiding the network will have any impact on overall security. In fact, it might just make it harder to identify your network when trying to connect with it, so it has very limited use cases generally.
A strong home Wi-Fi network includes a strong firewall and a good password, as well as keeping your internet hardware, like your Wi-Fi router, up-to-date with firmware. That being said, a hidden Wi-Fi network might be the right way to go if you want to prevent confusion as a public business broadcasting free Wi-Fi or want to prevent roommates or neighbors from trying to connect to your network.


