9 CapCut Video Editing Tricks That Feel Like Magic
CapCut, the mobile video editor from TikTok parent company ByteDance, is among the most popular such apps in the Apple App Store and Google Play Store, and for good reason. For a mobile app, CapCut is astonishingly capable. Once you master the sometimes odd and unintuitive workflow, you'll find that it can do a lot more than you'd expect from a mobile app. In fact, some of the video editing tricks it makes possible are so astonishing that they feel like magic. From using AI to translate your voice into another language to slick video edits that sync automatically to music, CapCut is always churning out new features.
CapCut's secret weapon is AI and machine learning, which help it tackle editing tasks in a matter of minutes that would otherwise take hours of painstaking manual adjustments in a traditional editor and aren't available on mobile editors like Adobe Premiere Rush. From the ability to generate eerily lifelike AI voiceovers — cloning your voice — to keyframing and tracking shots with the push of a button, we've rounded up some of the most powerful features CapCut has to offer.
Some of the features listed in this article require a CapCut Pro subscription to access. You'll be able to identify these in the app by looking for the shimmering "Pro" label on them. CapCut receives frequent updates, so if you don't see the features listed here, try updating the app. Some of the AI features will send your video data to Bytedance for processing, so don't use them unless you're comfortable with that data leaving your device. Now, without further ado, let's jump into some of the most mind-blowing video editing tricks CapCut has to offer.
Create a voiceover with AI text to speech

If you've spent a lot of time on TikTok, you've probably heard your fair share of AI voiceovers. These computer-generated voices are sometimes laughably robotic, other times shockingly lifelike, but they've become ubiquitous in short-form videos. But what you perhaps didn't know is that they're incredibly easy to create with CapCut. However, the ability to do so is hidden in the text field settings rather than the audio settings, which means that many users don't know how to create AI text-to-speech voiceovers.
To create an AI text-to-speech voiceover in CapCut:
- Open the project you'd like to add voiceover to or create a new one, then tap the Text button in the carousel at the bottom of the screen.
- Tap Text to audio.
- In the text field at the top, type or paste in the script you'd like to hear read aloud.
- In the Select voice section under the text field, choose from the available voice models. You can expand the list by tapping More voices. Not all available voices are of equal quality. Some sound much more human than others, so hunt around until you find one you like.
- Tap Next. You'll have the option to split the text into separate captions. If you want to be able to get rid of the onscreen text after the voiceover generates, you should do so. The app will then generate both a text and audio layer for the voiceover which can be edited separately.
Create an AI character to narrate your video
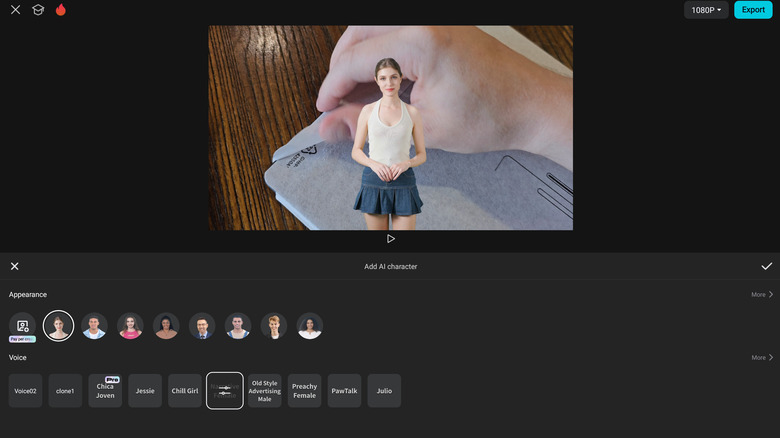
Perhaps the most futuristic feature in CapCut is the ability to add an AI-generated person to your video who can read your script aloud. It's so impressive that it's a little creepy the first few times you use it. Not only will the generated avatar read your script and make hand gestures to compliment what's being said, but its lips will even sync up to the script. There are a variety of different characters to choose from across a spectrum of identities so you can pick the presentation that best fits your needs. Here's how to bring them to life:
- Open a project in CapCut or create a new one.
- Create captions for the project using the Captions tool, or create a text overlay using the Text tool.
- Tap on the text element you want your AI character to read aloud.
- Tap on AI characters from the list of tools at the bottom of the screen.
- Choose a stock character from the Appearance section. You can also create a character based on video footage of an actual person. However, this costs $29 per month for each character generated. If you choose to generate your own character, you should only use footage of yourself or someone who has consented to having an AI version of themselves generated.
- Choose a voice from the Voice section. If you've created a custom voice as outlined in the prior section of this article, those will appear as options. Not all stock voices are equal in quality, so hunt around for one that sounds natural.
- Tap the checkmark in the top right of the tool. After loading, the AI character will be inserted in the video.
Clone yourself with custom AI voices
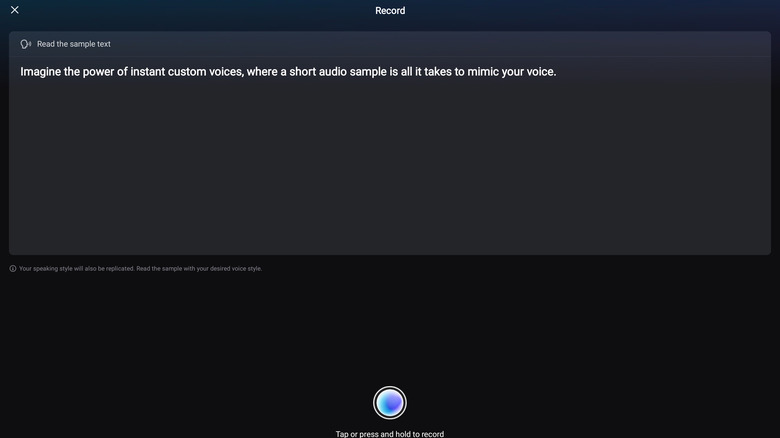
The most magical use of AI voice technology in CapCut is the ability to clone your voice, or that of a consenting friend, using the custom voices feature. What's most impressive (and concerning) about this feature is that it only requires a small recording of your speech to create an AI voice model that will say anything in your voice. Once the model is set up, you can use it to record AI voiceovers just like the ones we discussed earlier in this article.
Here's how to create a custom voice in CapCut:
- Open a project in CapCut or create a new one.
- Tap on Audio from the tools menu at the bottom of the screen.
- Tap on Custom voices.
- Tap the plus (+) button.
- You will see one or two sentences of text. Tap the record button at the bottom of the screen, read the text aloud, and press the record button once more to stop recording.
- A loading popup will appear while your voice is generated, which may take several minutes. After it's done, you'll see a confirmation screen. From here, you can listen to a sample of your AI voice clone in both English and Chinese. Underneath those options, you'll see a text field where you can add a name for this voice model.
- You will be returned to the Custom voices tool in the main CapCut editing interface. Choose the voice you just made, then tap Use voice.
- Type or paste the text you'd like to hear your AI clone read, then tap Generate speech.
Be aware that translating a video costs real money, since it uses CapCut Credits that must be replenished with micro transactions.
AutoCut
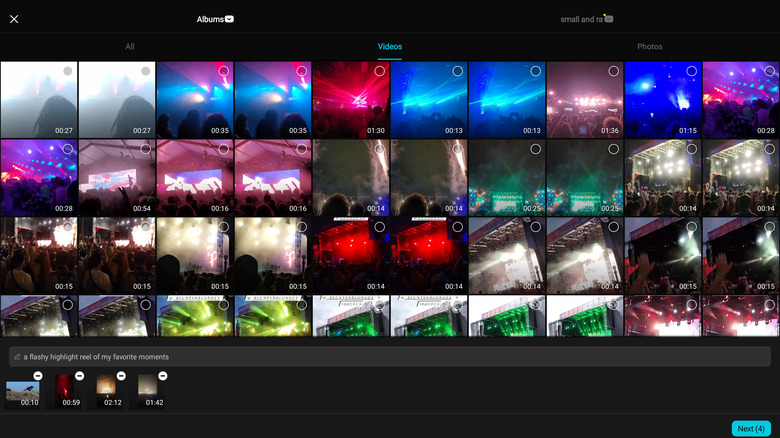
If you've ever seen a slickly produced compilation of someone's photoshoots or daily routine posted to TikTok and scored to a trending sound, you're not missing out on a hidden TikTok feature. There's a good chance it was made using CapCut's AutoCut feature. This AI-powered tool will take video clips of your choosing, pick out the most exciting or interesting moments from each, then edit them together into a slick montage set to music. Similar features exist in apps like Google Photos or your phone's Photos or Gallery app, but they're not very good, whereas AutoCut generally generates a video you'd want to share on social media.
Here's how to make your own AutoCut video:
- From the Edit tab of the CapCut app, tap the AutoCut button. You may need to press the downward arrow near the top right corner of the app to expand the options in order to see it.
- Select all the video clips you want to include in the AutoCut montage by tapping the small circle in the top right of each preview square. Tapping the video itself will let you preview it.
- Once you've selected your video clips, you can give the AI more specific instructions for what you'd like the finished video to look like by typing in the text field near the bottom of the screen. This is optional.
- Press the Next button. The app will process the clips and generate video options.
- Scroll through the carousel of video templates at the bottom of the screen until you find the one you like. You can change the music by tapping Replace, edit the video further by tapping Edit, or export the AI-generated video by tapping Export.
Use AI to keyframe and track shots
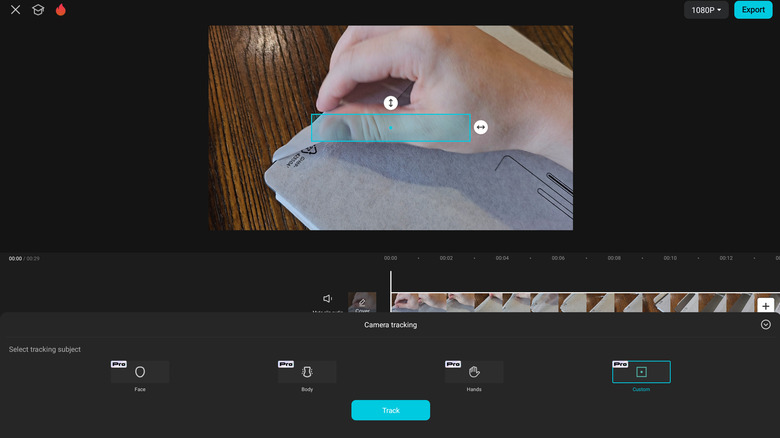
Tracking shots are a staple of cinematography, and many iconic movie shots are centered around tracking the subject so they never move in frame, even as they move through space. But creating a tracked shot is a laborious process. Traditionally, an editor would need to create perhaps hundreds of keyframes, zooming and panning to keep the subject centered on each one. But with CapCut, those hours of work become a few seconds of waiting for the software to do it.
To auto-track a shot in CapCut:
- Open a project in CapCut and import the clip you'd like to apply tracking to.
- Tap on the clip to highlight it, then tap Camera tracking from the carousel of tools at the bottom of the screen.
- Tap camera tracking.
- Choose whether you want CapCut to track the subject's face, body, hands, or something else. Most of the time, for human subjects, face or body work best.
- Tap Track. A loading popup will appear as CapCut analyzes the clip frame by frame to keyframe and adjust the shot. This may take several minutes depending on the clip you're tracking.
- After the shot is done automatically tracking, you'll be able to choose from a number of options to enhance the effect. You can choose how much rotation you want applied with the Rotate slider, whether you want the shot fitted to the canvas with the Fit canvas toggle, whether you want the subject's face to remain the same size in the frame with the Keep face size toggle, and whether to blur the canvas with the Blur canvas toggle.
Easily remove the background from a clip
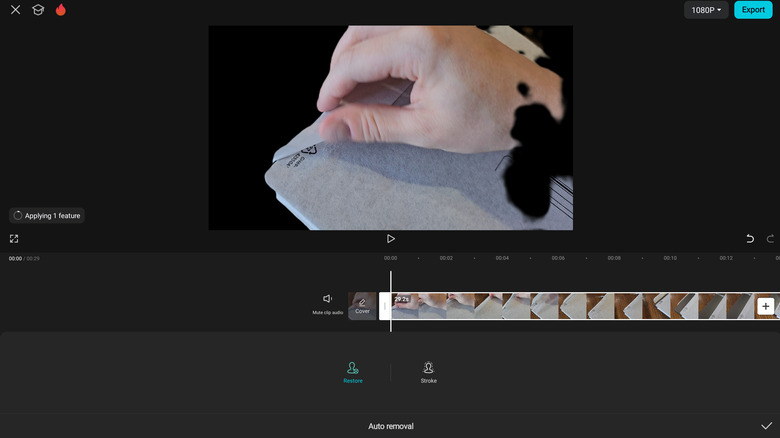
CapCut's ability to detect a person in a video and separate them from the background is truly astonishing but it's not magic, it's just a massive amount of training data. Bytedance, the company behind both CapCut and TikTok, has a massive library of user-generated content to train its AI with. Every video posted to its massively popular social media platform helps it get better, which is why its faux green screen features are so great. With only a few taps, you can remove the background of photos and videos.
To remove the background of a video clip in CapCut:
- Open a project in CapCut or create a new one.
- Tap the video clip you'd like to remove the background from to highlight it, then tap Remove BG from the tools menu at the bottom of the screen.
- Tap Auto removal.
- You will see the progress of the automatic background removal in a circular progress animation on the left side of the video preview area. Once it's done, the background should be fully removed from the clip.
- Oftentimes, CapCut won't fully cut everything out of the background, or will remove articles of clothing from the subject. To fix this:
- Tap the clip again to highlight it.
- Return to the Remove BG tool.
- Tap Customized cutout, then use the brush and erase tools to manually define which elements in the frame should be cut out. Once the effect is finished applying, tap the checkmark button.
Keep in mind that automatic background removal in CapCut works best with a video that features a clearly defined human subject against a simple backdrop. Videos that feature crowded or cluttered backgrounds will produce significantly worse results.
Apply beat-synced effects with Style
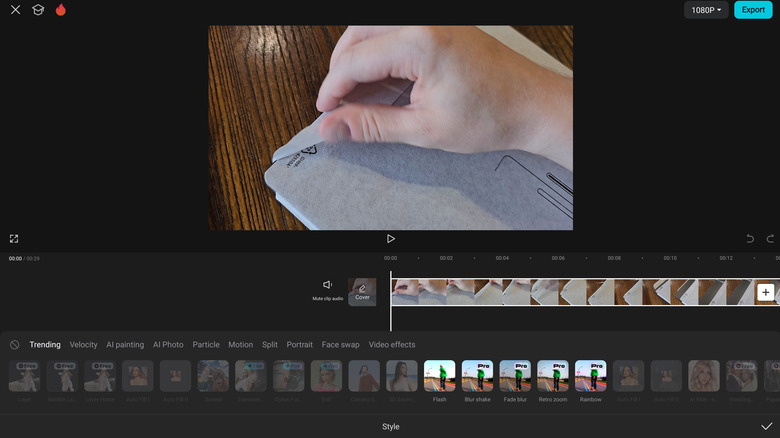
If you've ever been impressed by someone's "velocity" edit on TikTok, prepare to be much less impressed when you find out they did it with the press of a button in CapCut. That effect, which speeds and slows a video in time to music, is called Auto Velocity and it's one of many bundled into the Style tool in the popular mobile video editor. There are over 50 effects to choose from, ranging from speed manipulation effects like Auto Velocity to AI filters that will transform human subjects into paintings or cartoon characters, it's always worth seeing if any of the Style effects will make your video pop. The one caveat here is that not every Style applies to every video clip. CapCut will determine which effects can be applied to each clip, and any that are grayed out cannot be used.
Here's how to apply Style effects in CapCut:
- Open a project in CapCut or create a new one, then highlight the clip you want a Style effect applied to.
- Tap Effects from the tools menu at the bottom of the screen.
- Tap Style.
- Scroll through to find a Style you like. Make sure it's also available for the current clip. When you tap the Style, you may be prompted to allow your video to be transported to the cloud for processing. Note that this does mean your video file will briefly be copied to Bytedance's servers. If you allow access, the effect will be applied.
Sadly, only one Style at a time can be applied. The only way around this is to apply a Style to a clip, export the edited clip as its own video, import that video into CapCut, and then apply another Style.
Video translator makes multilingual videos easy
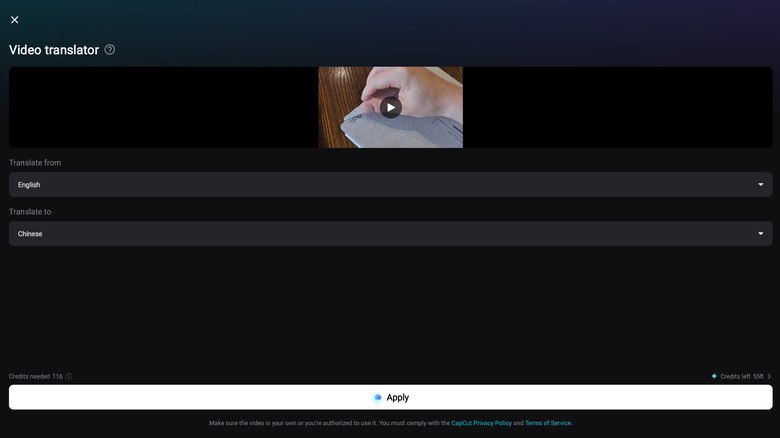
We live in an increasingly connected world, especially when it comes to video content. People from all over the globe have access to content from people who don't speak the same language. CapCut addresses this by including a video translation feature that will not only dub your clips in another language even make your lips sync to the new words. If you're making content that's meant to be viewed in multiple languages, this translation feature is a game changer.
For the best results, you'll want to use this feature on videos that feature a clear human subject against a plain, uncluttered background. The person should be facing the camera with their lips fully visible at all times. If your subject scratches their nose in the middle and obscures their lips, the lip sync effect won't look quite right. Additionally, the feature is currently limited to English, Chinese, Japanese, Spanish, Indonesian, and Portuguese.
To use CapCut's video translation feature:
- Open a project in CapCut, or create a new one containing the video clip you want translated, then tap the clip to highlight it.
- Tap Video translator from the tools menu at the bottom of the screen.
- In the following dialogue, select the language the original video is in, as well as the language you'd like it translated to.
- Tap Apply. Be aware that translating a video costs real money, since it uses CapCut Credits that must be replenished with micro transactions. You will see the cost of the translation in the bottom left of the screen before tapping apply, and a pop-up will ask you to confirm that you want to spend the credits. It may take several minutes after confirming for the effect to be fully applied.
Remove background noise with Isolate Voice
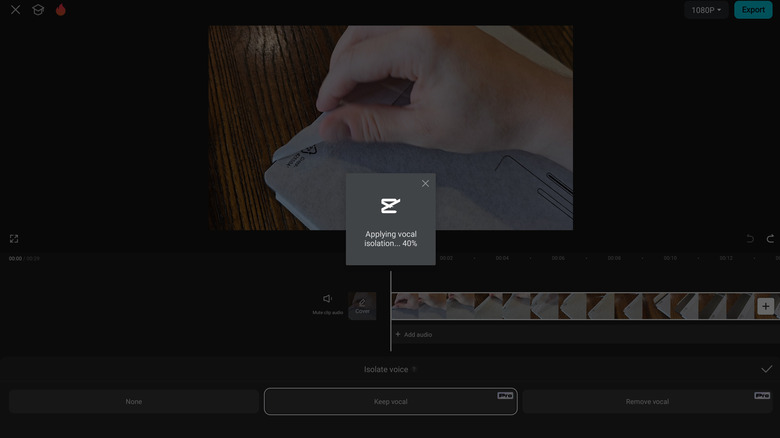
CapCut has dedicated a lot of work to making it a great video editor for mobile content creators. If you're someone who records video on the go, whether for TikTok, Instagram, or elsewhere, you know how difficult it can be to find a spot without background noise that makes it harder to hear your voice while making the video seem less professional. CapCut fixes this with a feature that uses AI to isolate your voice in a recording and cut out noise from A/C, wind, background chatter, or whatever else is interfering with your recording environment. In fact, not only can you keep your vocals in, but you can do the inverse — removing your vocals while keeping all the background noise. That's perfect for videos where you were talking to someone while filming, such as giving stage directions, but don't want that speech to end up in the final cut.
To isolate a voice in CapCut:
- Open a project in CapCut, or create a new one containing the video clip you want translated, then tap the clip to highlight it.
- Find and tap Isolate Voice in the tools menu at the bottom of the screen.
- Choose whether you want to keep the vocal or remove it. A dialogue will pop up with a progress meter. Once it's done, the vocal will be isolated in the audio track of the video clip.
Once you've got your isolated voice stem, you can do even more to enhance it. For example, you can separate it from the video into its own layer with the Extract audio function, apply other audio effects to it, or use it to generate captions. You can even use it to translate the audio into another language, similar to video translation described above.